UNLcms Instruction Video
Keith McGuffey
Author
07/18/2019
Added
140
Plays
Description
Instructions for UNLcms sites in the 5.0 Framework using Drupal 7.
Timecodes:
00:00 – Getting started and logging in
00:47 – Terms
02:42 – Adding a Page to a Site
04:58 – Headings
06:58 – Formatting Text
08:01 – Images
10:07 – Links
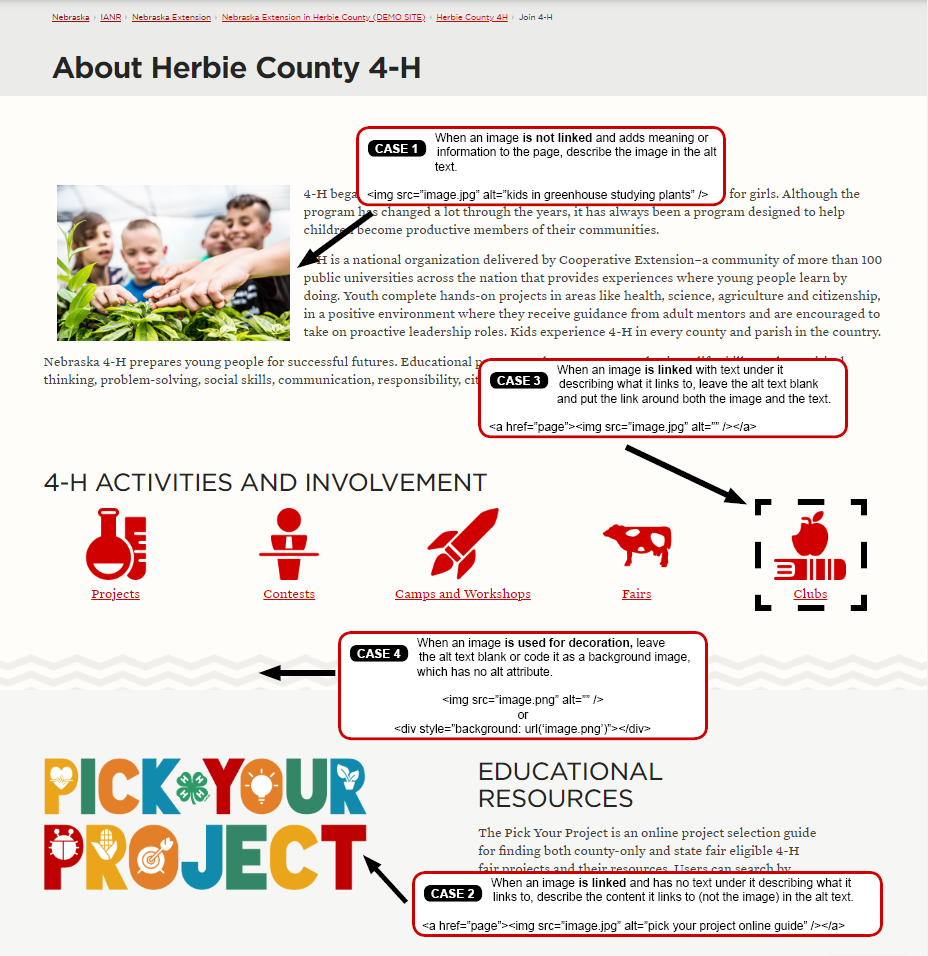
-Link to Alternate Text Examples: https://ianrmedia.unl.edu/images/resources/img-alt-text-example.png
14:16 – Hero
15:30 – Unpublishing Content
16:11 – Revisions
17:12 – Deleting Content
17:34 – Finding Content
18:09 – Articles
20:06 – Book Pages
20:43 – Webforms
26:54 – Site-wide Content
27:23 – Navigation Menu
27:56 – Footer
28:38 – Appearance
29:00 – Users
29:22 – Modules
29:38 – Configuration
30:01 – Thank you for watching!
Timecodes:
00:00 – Getting started and logging in
00:47 – Terms
02:42 – Adding a Page to a Site
04:58 – Headings
06:58 – Formatting Text
08:01 – Images
10:07 – Links
-Link to Alternate Text Examples: https://ianrmedia.unl.edu/images/resources/img-alt-text-example.png
14:16 – Hero
15:30 – Unpublishing Content
16:11 – Revisions
17:12 – Deleting Content
17:34 – Finding Content
18:09 – Articles
20:06 – Book Pages
20:43 – Webforms
26:54 – Site-wide Content
27:23 – Navigation Menu
27:56 – Footer
28:38 – Appearance
29:00 – Users
29:22 – Modules
29:38 – Configuration
30:01 – Thank you for watching!
Searchable Transcript
Toggle between list and paragraph view.
- [00:00:01.159]Hi! I’m Keith McGuffey, a Web Specialist with IANR Media.
- [00:00:04.837]I’m going to show you how to create and edit content on a site.
- [00:00:07.833]This video covers sites in the UNLcms that are in the 5.0 Framework using Drupal 7.
- [00:00:13.546]This is a long video, so if you’re looking for a specific topic, please see
- [00:00:17.124]the timestamps I’ve included in the description of this video,
- [00:00:20.315]or use the searchable transcript.
- [00:00:24.382]To start, let’s log into the site.
- [00:00:26.841]Click ‘Log in’ and sign in with your My.UNL credentials.
- [00:00:30.272]You may need to complete two factor authentication.
- [00:00:38.838]You’ll notice that the ‘Log In’ text has changed to your name,
- [00:00:42.396]your profile image may be included, and there are a set of
- [00:00:45.165]Administration Menus at the top of the page.
- [00:00:51.268]Before we get started adding and editing content, let’s quickly go over some terms.
- [00:00:55.816]There’s not a test at the end, I just want to be sure we’re on the same page as
- [00:00:59.591]we go through this video.
- [00:01:01.471]Like I mentioned, the Administration Menus are the black and gray menus at the
- [00:01:05.183]top of the page.
- [00:01:06.248]These let us add and find content, and update the structure and appearance
- [00:01:09.774]of the entire site.
- [00:01:11.043]Depending on your level of access, your administration toolbars may have
- [00:01:14.494]some different options than what you see here.
- [00:01:17.108]Below this is the head of the page, which shows the site title and affiliation.
- [00:01:21.151]In the upper right, we have the Content Control Tabs.
- [00:01:24.134]These allow us to edit the content on the current page, as well as review
- [00:01:27.656]revisions made to the page.
- [00:01:29.886]The red bar across the top of the page is the Navigation Menu.
- [00:01:32.899]The Navigation Menu helps users find content and understand the structure
- [00:01:36.400]of the site.
- [00:01:37.418]The framework supports up to six top level pages.
- [00:01:40.202]These are the ‘parent items’ to the ‘child’ pages listed below.
- [00:01:43.344]At mobile widths, this will display at the bottom of the page.
- [00:01:47.043]We’ll talk more about adding content to this menu later in the video.
- [00:01:53.066]Under the Navigation Menu, we have the Hero region.
- [00:01:55.944]By default, the Hero consists of the Page Title and Breadcrumbs showing
- [00:01:59.331]where the page sits in the site’s architecture.
- [00:02:02.397]Below this, we have the body of the page.
- [00:02:05.088]This is where the majority of edits will occur.
- [00:02:07.952]At the bottom of the page, we have the footer.
- [00:02:10.392]This contains contact information and related links.
- [00:02:13.645]We can also access the Web Audit system from here with the ‘QA Test’ link.
- [00:02:17.561]Web Audit is a useful tool when we talk about site validation
- [00:02:20.963]and accessibility.
- [00:02:25.397]When we edit a page, we’ll be working with different Fields.
- [00:02:32.115]And finally, when we discuss images and documents, we’ll be using the
- [00:02:35.437]File Browser.
- [00:02:36.984]This is similar to the File Explorer on a Windows PC or Finder on a Mac.
- [00:02:46.022]Let’s add a page to the site.
- [00:02:47.994]From any page on the site, go to ‘Add Content’ in the gray
- [00:02:50.781]Administration Menu.
- [00:02:52.564]Here we have a list of the different types of pages, or content types, available.
- [00:02:56.603]Most of these are specific to a site, so what you see may be a bit different
- [00:03:00.793]from what’s on screen.
- [00:03:02.411]Let’s create a Basic Page.
- [00:03:05.589]We’ll need to add a title for the page.
- [00:03:07.777]In this example, I’m going to make a fake ‘Courses’ page for IANR Media.
- [00:03:12.770]Let’s title the page “Courses”.
- [00:03:16.257]The Body field lets us add content to the page.
- [00:03:19.859]This toolbar gives us some options for styling text and inserting images and links.
- [00:03:24.735]If you’re copy/pasting your content from another text editor or Microsoft Word,
- [00:03:29.268]the ‘Paste as Plain Text’ or ‘Paste from Word’ options are your best friend.
- [00:03:33.905]The ‘Show/hide toolbars’ button gives us some more options.
- [00:03:37.633]For now, I’ll put some text into the Body field.
- [00:03:40.519]We’ll edit it a bit later.
- [00:03:43.563]Scrolling down, you’ll see options in the left menu.
- [00:03:46.303]Depending on your permissions and site configuration, what’s on screen may be
- [00:03:50.121]different than what you see.
- [00:03:51.853]The Site Hierarchy lets us control where this page exists.
- [00:03:54.838]This will influence the page’s Breadcrumbs.
- [00:03:57.937]I’m going to select this page’s Parent Item as “What We Do”.
- [00:04:02.000]The ‘Display in Menu’ checkbox will include this page in the Navigation Menu,
- [00:04:05.659]under its parent item, and will display the Menu Link Title.
- [00:04:09.589]The Weight option will determine the page’s placement under the parent item
- [00:04:13.372]in the Navigation Menu.
- [00:04:15.522]Because this is a test page, and because the framework only supports one level of
- [00:04:19.484]child pages in the Navigation Menu, I’ll leave the ‘Display in Menu’ option unchecked.
- [00:04:25.140]Other options in this menu allow us to edit access to the page,
- [00:04:30.142]edit the Hero region, and unpublish pages.
- [00:04:33.121]I’ll talk about some of these later in the video.
- [00:04:35.532]Let’s save the page.
- [00:04:39.505]The Title is displayed in the Hero region, and we can see the Breadcrumbs
- [00:04:43.263]reflect this page’s Parent item.
- [00:04:46.013]The Body shows what was put into the Body field.
- [00:04:48.853]Note that this page is live right now.
- [00:04:51.109]I could send the URL to a coworker and they could view my work.
- [00:04:54.663]I’ll show you how to unpublish this page later in the video.
- [00:05:02.469]Right now, this page isn’t very visually appealing or useful.
- [00:05:06.635]Let’s edit the text to create a structure for the page.
- [00:05:09.589]Select ‘Edit’ from the Content Control Tabs.
- [00:05:14.419]In the Body field, let’s create Headings using the style dropdown.
- [00:05:18.290]Headings go from Heading 1 to Heading 6 and help create the
- [00:05:21.507]structure of the page.
- [00:05:23.564]This structure is useful for search engines, creates visual separation between sections,
- [00:05:28.211]and makes the page accessible to individuals using assistive technologies.
- [00:05:33.595]I try to visualize headers as bulleted lists, and keep a logical,
- [00:05:36.963]consistent structure.
- [00:05:38.744]Here we have the Heading 1, Heading 2, and Heading 3.
- [00:05:42.391]Let’s highlight this first line.
- [00:05:44.124]The title of our page is set to Heading 1, so we’ll make this a Heading 2.
- [00:05:48.429]We can see the change visually by a larger, bolder text.
- [00:05:52.093]This courses offered section then has a heading for Graduate and Undergraduate
- [00:05:56.385]courses.
- [00:05:57.952]Let’s highlight those and make them each a Heading 3.
- [00:06:10.189]Now we’ll do the same for Spring 2021.
- [00:06:13.394]And note that we’re using the headings in order.
- [00:06:15.831]If we were to skip to a Heading 4 or a Heading 6 from a Heading 3, our page
- [00:06:20.293]structure wouldn’t look right.
- [00:06:22.385]Think back to that bulleted list example.
- [00:06:43.343]Let’s use the ‘Preview’ button to see our work, then save the page.
- [00:07:02.553]Let’s make these courses into lists and add some text decoration
- [00:07:06.335]to this bit of text.
- [00:07:08.016]Edit the page.
- [00:07:10.702]First, let’s emphasis this bit of text.
- [00:07:12.785]We’ve seen that Headings make text larger and bold, but we don’t want to use
- [00:07:16.373]Headings for this text.
- [00:07:18.323]Referring again to the bulleted list example, this messes up the page structure.
- [00:07:23.132]Let’s use the ‘Bold’ and ‘Italic’ options in the toolbar instead.
- [00:07:27.776]To make this a bulleted list, let’s highlight the text and select
- [00:07:30.916]‘Insert/Remove Bulleted List’ from the toolbar.
- [00:07:34.474]We’ll do the same for the courses under ‘Undergraduate’.
- [00:07:41.441]For the sake of time and space in this video, I’m going to remove the
- [00:07:44.741]Spring 2021 section.
- [00:07:47.438]Let’s preview then save our work.
- [00:08:05.129]Let’s add a picture to this page.
- [00:08:08.136]For this example, I’m going to add my headshot to the bottom of the page.
- [00:08:11.872]Go to Edit in the Content Control Tabs.
- [00:08:15.815]Let’s place our cursor at the bottom of the Body field, then select
- [00:08:18.997]‘Insert/Edit Image’ from the toolbar.
- [00:08:24.479]In this popup window, let’s click on the ‘Browse’ button next to the
- [00:08:28.027]‘Image URL’ field.
- [00:08:30.119]This brings up the File Browser.
- [00:08:32.086]As I mentioned before, this works similar to the file browser on your
- [00:08:35.371]computer.
- [00:08:36.178]We can search through the directories on the left to find the images folder.
- [00:08:40.451]If our image is already uploaded to the file browser, we can select it and
- [00:08:44.853]insert the file.
- [00:08:46.567]We can also upload an image with the Upload option.
- [00:08:50.381]Select ‘Choose file’ and find the image on your computer.
- [00:08:53.506]Best practice for uploading an image include naming the image with short,
- [00:08:57.039]descriptive words in lowercase, with words separated by hyphens.
- [00:09:01.314]Notice I’ve named this image keith-mcguffey.
- [00:09:05.723]Select the image, then Upload and Insert File.
- [00:09:10.670]We’re taken back to the popup where we have some optional fields related
- [00:09:14.165]to alignment, dimensions and border.
- [00:09:16.969]The most important field here is the Image Description.
- [00:09:19.957]Because search engines and screen readers cannot view images, we need to provide a
- [00:09:24.429]text alternative.
- [00:09:26.204]This text will also display if a user opts out of loading images to save on data,
- [00:09:30.323]or the image fails to load.
- [00:09:32.683]This text should describe the content of the image.
- [00:09:35.227]Although the CMS will allow you to upload an image without this image
- [00:09:38.495]description, you should generally consider it a required field.
- [00:09:42.483]Because this is my headshot, let’s make the description my name.
- [00:09:45.860]Note that we do not need to say ‘Image of Keith McGuffey’ or
- [00:09:48.741]‘Picture of Keith McGuffey’.
- [00:09:50.462]There is code that already defines this as an image.
- [00:09:53.892]Let’s Insert this image, then preview and save our work.
- [00:10:11.045]Let’s add some links to other sites on this page, in this case,
- [00:10:14.208]UNL’s Course Catalog.
- [00:10:16.641]I’ll copy the URL to the graduate Course Catalog from another tab.
- [00:10:26.173]Let’s edit the page and highlight the text we want to make a link,
- [00:10:29.290]then select ‘Insert/edit link’.
- [00:10:33.974]In this popup, let’s paste the URL we want to link to.
- [00:10:37.202]By default, the link will open in the same tab.
- [00:10:39.798]Because we’re linking to another site, let’s select the ‘Open Link in
- [00:10:43.043]New Window’ option, which will open the site in a new tab.
- [00:10:47.541]This is not a hard rule, but it’s a good indication to a user that
- [00:10:50.903]they’ve left the current site.
- [00:10:53.311]Insert the link then save the page.
- [00:10:56.452]Let’s test the link to be sure it’s opening to the correct page in a different tab.
- [00:11:02.325]Let’s do the same with the Undergraduate catalog.
- [00:11:10.520]Again, we’ll highlight the text, select ‘Insert/edit link’,
- [00:11:13.952]paste the URL of the page we want to link to and select the
- [00:11:17.321]‘Open Link in New Window’ option.
- [00:11:20.453]Let’s test this as well.
- [00:11:35.543]When creating a text link, be sure to use descriptive text, instead of linking
- [00:11:39.801]text that says just ‘Click here’.
- [00:11:43.009]The link text should give the user an idea of the function of the link.
- [00:11:58.757]If we are linking to a page within the same site, we do not need to include
- [00:12:02.412]the entire URL, only the portion after “.unl.edu/”.
- [00:12:09.130]In this example, I’m working on a page on the ianrmedia.unl.edu site.
- [00:12:15.929]If I wanted to include a link to the IANR Media Web Resources, I would
- [00:12:20.171]only need to include the URL after “.unl.edu/," “resources” in this example,
- [00:12:27.416]for the Link URL.
- [00:12:35.226]We don’t need this to open in a new tab, as generally users expect links that open
- [00:12:39.771]pages in the same site to open in the same tab.
- [00:12:44.291]I’ll save this and test to make sure it works properly.
- [00:12:55.082]The same steps apply to making an image a link. Highlight the image, select
- [00:12:59.226]‘Insert/edit link’, and provide a URL.
- [00:13:03.261]There are some additional considerations for making an image a link.
- [00:13:06.496]The Image Description should describe the purpose of the link.
- [00:13:10.024]We could also include an image with text under it as a link and leave the
- [00:13:13.498]Image Description blank.
- [00:13:15.215]Check out the Quick Guide on IANR Media’s Website Resources page for more
- [00:13:18.640]information on this.
- [00:13:20.215]I’ll include a link in the description of this video.
- [00:13:27.504]To link to a document, highlight the text you want to link.
- [00:13:33.255]I’ve been sure to highlight text that will describe the link.
- [00:13:37.138]Select ‘Insert/Edit link’, then select ‘Browse’ next to the Link URL field.
- [00:13:41.287]Similar to inserting an image, we can use the File Browser to locate or upload
- [00:13:46.383]the document we want to link to.
- [00:13:49.201]Select and insert the document.
- [00:13:53.819]Again, we can select that the document open in a new tab, although this is
- [00:13:57.397]generally only useful for PDFs.
- [00:14:00.274]The ‘Title’ field is what will optionally display if a user hovers their mouse
- [00:14:04.284]over the link.
- [00:14:05.776]We can ignore the ‘Class’ field.
- [00:14:08.047]Let’s save and test this link.
- [00:14:22.332]Let’s add an image to the Hero area of this page.
- [00:14:25.419]Edit the page and scroll to the option menu at the bottom of the page.
- [00:14:30.923]Select Hero.
- [00:14:33.160]Here, we can upload and select the size of the Hero, give the Hero optional
- [00:14:36.909]titles and subheadings, and add a photo credit if applicable.
- [00:14:41.583]The recommended image size is 1600 x 900 pixels, but note that
- [00:14:45.549]some cropping will occur.
- [00:14:48.205]I’m going to upload this image of a soybean field as an example.
- [00:14:52.330]This image uploader works a bit differently than the one in the
- [00:14:55.426]Body field. It prompts you to upload an image from your computer
- [00:14:58.946]instead of using the File Browser.
- [00:15:01.613]I’ll still fill out the alternate text field, then select a size and add
- [00:15:05.086]title and subhead text.
- [00:15:15.539]I’ll add a photo credit for this example as well.
- [00:15:24.478]We can see this Hero overrides the page title and includes the breadcrumbs
- [00:15:28.064]at the bottom of the Hero image.
- [00:15:34.221]When we’re working with content we may want to hide pages.
- [00:15:37.373]Unpublished content is not visible to general end users.
- [00:15:40.889]This can be useful for articles or pages that are in development, or pages you
- [00:15:44.640]may be using to test layouts.
- [00:15:47.059]To unpublish a page, Edit the page and scroll to the bottom.
- [00:15:53.567]In the left menu, select ‘Publishing Options’ and uncheck the ‘Published’
- [00:15:57.287]option.
- [00:15:58.841]Save the page.
- [00:16:00.898]The background of unpublished content will have a red tint.
- [00:16:03.921]This content will only appear to UNL users with the proper permissions
- [00:16:08.643]when they are logged in.
- [00:16:15.426]Every time we save a page, a revision is made.
- [00:16:18.506]If we’ve made edits to a page that we are not happy with, we can always revert
- [00:16:22.264]to an older version of the page.
- [00:16:24.634]Select ‘Revisions’ from the Content Control Tabs.
- [00:16:28.113]Here, we can see previous versions of the page.
- [00:16:30.971]Selecting a version will show us a preview of that revision.
- [00:16:37.516]The ‘Compare’ option lets us see the changes made between versions.
- [00:16:44.701]When we find a revision we like, the ‘Revert’ option lets us make the
- [00:16:48.271]selected revision live.
- [00:16:55.202]Selecting a revision makes a new revision, so if we decide later that we actually did
- [00:16:59.285]like the edits we made, we can always revert back to that revision.
- [00:17:16.334]If you ever need to delete a page, select ‘Edit’ and then ‘Delete’ at the
- [00:17:20.934]bottom of the page.
- [00:17:23.843]You’ll be asked to confirm this deletion.
- [00:17:26.514]Note that this will also delete any revisions of the page, so be sure
- [00:17:30.034]you are confident the page needs to be deleted before confirming.
- [00:17:37.201]If you’re looking for a specific page that you are able to edit, select
- [00:17:41.136]‘Find Content’ in the gray Administration Menu.
- [00:17:44.277]Here, we can search for content filtered by publication and type.
- [00:17:47.993]We can also sort content based on the table headings.
- [00:17:51.452]I know the page I just created is not published, so I can search for not
- [00:17:54.863]published items to find the page more easily.
- [00:17:58.701]If we need to find a file or image on our site, we can access the File Browser to
- [00:18:02.929]look through the documents on the site.
- [00:18:05.328]We can also upload documents here.
- [00:18:13.038]These are the basics of creating content using basic pages.
- [00:18:17.758]I want to quickly touch on some other common content types before we move
- [00:18:21.274]on to some other concepts.
- [00:18:23.320]Most sites have some type of newsfeed that is populated with an ‘Article’ or
- [00:18:26.908]‘News’ content type.
- [00:18:28.701]I’ve been working on the IANR Media site which does not have a newsfeed, so I’m
- [00:18:32.701]going to move to the IANR News site to talk about articles.
- [00:18:36.725]Article pages may have more fields than your basic page, and have templates that
- [00:18:40.590]control those fields.
- [00:18:42.372]The fields in your article content type may vary.
- [00:18:45.264]I won’t create an article here, but I’ll show how these fields work with
- [00:18:48.715]the template for IANR News.
- [00:18:51.207]We can see this article has a title, image and summary in the newsfeed.
- [00:18:55.201]When we go to the article’s page, we can see the title, image with caption,
- [00:18:59.554]body, and tags.
- [00:19:02.046]I’ll edit this page.
- [00:19:06.289]Here we can see the title, summary and body fields.
- [00:19:10.097]By default, the newsfeed on the homepage will pull in the first few
- [00:19:13.263]lines of the Body, but this is not the best for our users.
- [00:19:17.060]We can edit the summary by clicking ‘Edit Summary’ beside the label for the
- [00:19:20.617]Body field.
- [00:19:22.327]The summary is hidden by default, so don’t forget to fill it out before
- [00:19:25.715]publishing your article.
- [00:19:28.685]Below this, IANR News has tags to group articles together.
- [00:19:33.470]We then have an image uploader, which functions the same as the image uploader
- [00:19:37.263]for the Hero image.
- [00:19:39.639]Below this, IANR News has included a caption field for the image.
- [00:19:43.606]Your image uploader may include this or have a ‘Title’ field related to the
- [00:19:47.159]image uploader.
- [00:19:49.162]In the publishing options, we can see that this article has ‘Promoted to front page’
- [00:19:53.217]checked.
- [00:19:54.452]This will include the article in the newsfeed of the homepage.
- [00:19:57.611]‘Sticky at top of lists’ forces the article to the top of the newsfeed.
- [00:20:01.782]Let’s go back to the IANR Media site.
- [00:20:10.375]Book pages are very similar to basic pages, but include a built in navigation hierarchy
- [00:20:16.657]that can be accessed under the ‘Book outline’ option.
- [00:20:20.171]IANR Media’s Web Resources are all book pages and include
- [00:20:24.039]this navigation menu.
- [00:20:31.991]We can see that this page is a part of the ‘Resources’ book,
- [00:20:35.062]it belongs under the ‘Images’ page, and I’ve given it a weight of -1,
- [00:20:38.731]which determines how the pages under ‘Images’ are ordered.
- [00:20:46.971]Finally, let’s discuss Webforms.
- [00:20:49.506]Webforms allow users to submit information to the web server.
- [00:20:53.370]This information can be downloaded or sent via email as the form is
- [00:20:57.102]completed.
- [00:20:58.654]Let’s make a Webform by selecting ‘Add Content’ and ‘Webform’.
- [00:21:04.170]This edit screen is similar to the one for a basic page.
- [00:21:07.472]Let’s put in a title.
- [00:21:11.372]I’ll leave the body blank, but know that the body appears above the Webform.
- [00:21:16.186]After saving this page, we’ll be taken to the Form Builder.
- [00:21:19.626]In the Content Control Tabs, we can see there are ‘Edit’ and ‘Webform’ functions.
- [00:21:25.142]‘Edit’ will allow you to edit the Title and Body and select publishing options,
- [00:21:29.646]‘Webform’ allows you to edit the fields a user will fill in.
- [00:21:33.176]The ‘Webform’ tab includes a few more options for Components, Conditionals,
- [00:21:37.670]E-mails, and Form settings.
- [00:21:41.034]The Form Builder let’s drag and drop fields to create a form.
- [00:21:44.579]Let’s create a very basic form.
- [00:21:47.355]Drag a ‘Textfield’ into the Form Builder.
- [00:21:50.009]Selecting ‘Configure’ will allow us to change the options of this field.
- [00:21:54.857]Let’s call this field ‘Name’, and make the field required under the
- [00:21:58.065]Validation Tab.
- [00:22:00.399]Let’s ask for an E-mail as well.
- [00:22:02.880]Let’s drag an E-mail field into the Form Builder, rename it with the
- [00:22:06.725]configure option, and make it a required field.
- [00:22:15.923]Let’s save our work.
- [00:22:18.457]Unlike a Basic Page, we’re only shown this notice that the page has been
- [00:22:21.888]updated.
- [00:22:23.233]Let’s select ‘View’ in the Content Control Tabs to view the page.
- [00:22:29.583]Let’s look at some other options under the Webform tab.
- [00:22:33.365]‘Form components’ is similar to the ‘Form builder’.
- [00:22:36.509]‘Conditionals’ allows you to display or change the values of fields based
- [00:22:39.996]on the results of other fields.
- [00:22:42.677]For example, we can make a list of radio buttons with an ‘Other’ option,
- [00:22:46.606]then set a textfield of ‘Other’ to display only when ‘Other’ is selected.
- [00:22:51.422]I’ll show an example of this really quick.
- [00:23:56.202]‘Emails’ allow us to send a confirmation email to the user, or an email to
- [00:24:00.511]yourself or another staff whenever the form is complete.
- [00:24:04.581]In this example, I can send an email to myself.
- [00:24:10.612]We can update the subject of the email, along with the ‘from’ address and name.
- [00:24:15.721]The E-mail template is what will come to my email.
- [00:24:18.318]By default, this will give a notification that the form has been completed,
- [00:24:21.861]a quick rundown of all the submitted values, and a link to the
- [00:24:24.930]submission’s results page.
- [00:24:27.742]We can also use form keys to create emails that include the results of the form.
- [00:24:32.520]In this case, I’ll edit the template to show only who completed the form and
- [00:24:37.127]their email.
- [00:24:38.706]Form keys are available in the configure options of the field in the field builder,
- [00:24:43.128]and [submission:values:formkey] is the format to display the information
- [00:24:49.803]in the field.
- [00:24:51.803]I'll fill out this field, and show you a quick example of the e-mail
- [00:24:55.070]that I received.
- [00:26:07.430]‘Form settings’ allows us to edit the confirmation message and landing page
- [00:26:11.128]for the user, cap the number of submissions, and close the Webform.
- [00:26:16.070]We also have options for the progress bar at the top of the Webform,
- [00:26:19.400]and other options.
- [00:26:29.055]Let’s look at ‘Results’ in the Content Control Tabs.
- [00:26:32.448]Results allows us to see individual submissions, group them for analysis,
- [00:26:43.068]show multiple responses in a table format, and download results.
- [00:26:49.775]We have options here to download based on a timeframe or number of results.
- [00:26:58.947]So far, we’ve discussed how to add and edit content on a page by page basis.
- [00:27:04.297]Let’s move on to more site-wide information, such as the
- [00:27:07.305]Navigation Menu and footer.
- [00:27:09.831]Please note that depending on your permissions, you may not be able
- [00:27:13.043]to make these types of edits.
- [00:27:15.023]Unlike individual pages, there are no revisions for site-wide edits to blocks,
- [00:27:19.818]the Navigation Menu, or other configurations.
- [00:27:27.241]Earlier, I mentioned using the ‘Site Hierarchy’ options to include
- [00:27:31.231]pages in the Navigation Menu.
- [00:27:33.681]An easier way to edit the Navigation Menu is to go to ‘Structure’ and ‘Menus’.
- [00:27:39.334]Select ‘list links’ from ‘Main Menu’.
- [00:27:42.180]Here, we can edit which pages display in the Navigation Menu with the
- [00:27:45.555]‘Enabled’ checkbox.
- [00:27:47.587]We can drag and drop pages to form the structure of the site.
- [00:27:50.827]Selecting ‘Save Configuration’ at the bottom of the page saves the
- [00:27:54.143]Navigation Menu.
- [00:28:02.127]The contact information and related links in the site’s footer are controlled
- [00:28:06.138]by blocks.
- [00:28:08.479]We can edit these by going to Structure, then Blocks and configuring them from
- [00:28:12.595]the list of available blocks.
- [00:28:31.331]Hovering over the block will also bring up a gray gear icon, which will allow you
- [00:28:35.755]to edit the block as well.
- [00:28:42.066]Let’s go to the 5.0 theme settings under ‘Appearance’ in the Administration
- [00:28:47.188]Toolbar.
- [00:28:49.440]Here we can edit site-specific CSS and JavaScript.
- [00:28:53.476]Scrolling down, we have fields to update the site’s breadcrumbs and abbreviation.
- [00:29:03.959]Under ‘People’, we can add and edit permissions for users.
- [00:29:08.076]The ‘Import Users from UNL Directory’ option lets us add users, and we can
- [00:29:15.708]edit permissions with the ‘Edit’ option associated with each username.
- [00:29:25.890]‘Modules’ lists available modules from Drupal.
- [00:29:30.181]The modules needed should be active already, but if you need to turn one
- [00:29:33.722]on for something like Google Analytics, this is the place to look.
- [00:29:41.944]Under ‘Configuration’, we can edit site information such as the site name and
- [00:29:46.947]email address, include Google Analytics information, and manage
- [00:29:56.134]URL aliases and redirects.
- [00:30:04.447]Thank you for watching!
- [00:30:07.077]If you have any questions, feel free to contact me at kmcguffey2@unl.edu.
- [00:30:13.331]You can also contact IANR Media by sending an email to IANRMedia@unl.edu.
The screen size you are trying to search captions on is too small!
You can always jump over to MediaHub and check it out there.
Log in to post comments
Embed
Copy the following code into your page
HTML
<div style="padding-top: 56.25%; overflow: hidden; position:relative; -webkit-box-flex: 1; flex-grow: 1;">
  <iframe
    style="bottom: 0; left: 0; position: absolute; right: 0; top: 0; border: 0; height: 100%; width: 100%;"
    src="https://mediahub.unl.edu/media/11324?format=iframe&autoplay=0"
    title="Video Player:  UNLcms Instruction Video"
    allowfullscreen
  ></iframe>
</div>
Comments
0 Comments